HOME           ABOUT ME          RECIPES        

Wednesday, October 27, 2010

Glow-in-the-Dark Circle Skirts

I finally made the circle skirts with the glow-in-the-dark fabrics that I recently bought (which REALLY DO glow-in-the-dark!):


Awhile back I saw similar skirts being sold in the stores for much more than I was willing to pay. I studied the skirts and made a mental note on how I thought it was to be done. Coincidentally a little while later Dana over at "MADE" did a whole blog post about circle skirts and provided a FREE tutorial!  YES! YES and more YES!  (And no, no, and more no....I wouldn't have figured out the whole mathematic equation. No way!)

I went ahead and made all three skirts the same size as my girls pretty much wear the same clothes (WOW, I know!) One is just taller than the other! I also put my "Happy Hapa" labels on them which confused Kailani as she knew I made the skirts for her and her sister. "So why put labels on them?" Well, just because...(because Dana did it over at "Made" and since she is a crafting rockstar I am going to do the same. That's why.)

And they TWIRL! Boy do they twirl!


And they get you into the "CREEEEEEEEPY spirit for Halloween!


Thanks to Dana for an awesome, FREE tutorial!

Tuesday, October 26, 2010

Wordless Wednesday: No Snow Flurries Here...

Friends on the mainland are talking about snow flurries today.
Trust me, snow flurries are not in our forecast!  


Po'kai Bay - West Oahu


Thanks to Na Kama Kai for another awesome Sunday! 

Monday, October 25, 2010

Halloween - Spooky Specimen Jars!

Time to get ready for Halloween!

Believe it or not, I am NOT making costumes this year! Lucky for me my father bought the girls their Halloween costumes. A bumblebee and a ladybug. I told my husband he could be a flower (NOT going to happen) and I would be an exterminator. HA!

Anyways! I had been saving some glass jars for a project that never happened (mad scientest party turned Pokemon party) and decided to put them to use. Spooky specimen jars for Halloween!


Top row - spiders, giant flies, mice
Bottom row - cockroaches, skull, eyeballs, giant spider, snakes

As you can see some of the jars came out better than others! The cockroaches (first jar on the left) started out GREAT - they were  floating around in the jars at different depths but then they all kind of clumped together and sunk. The giant flies and mice did the opposite - instead of sinking they floated to the top. I spent a great deal of time (WAY too much time!) trying to troubleshoot and figure out how to fix the problem. In the end I just gave up. Seriously, my kids aren't gonna care. If anything they'll shake the jars to see the critters better! 

And while I think the Halloween fabric and ribbons on the the lids are a little too cutesy my kids insisted. And since this little project is really for them I had to oblige. :)

Here's a close up some of the jars:

Spiders, skull & eyeballs!

Cockroaches & giant flies - BOMB!

It's hard to see the spider in the first jar but it is AWESOME!
Spider, snakes & mice!

I would've loved to have found some fake body parts - fingers, toes, ear, etc. as well as a frog, brain, giant cockroach (I know I've seen them somewhere!) worms, and whatever else!

Wanna know how I did it? I found an easy tutorial over at Mom Moments. Her jars turned out so colorful! But I have to tell you, nothing helped me make the critters float better except for cramming them in the smallest jar possible. I also tried adding cooking oil (as suggested) to get a cooler effect and that bombed. I also found that the clear liquid hand soap (Softsoap brand) worked better than shampoo....that's what I'll use next time.

By the way.....fabric lovers....did you notice the green fabric in the background? Well...I'll tell you this now so  you can go out and find some before Halloween has come and gone.....the fabric is GLOW-IN-THE-DARK! My kids tested it out and their response was, "SOOOOOO COOOOOOL!" I actually got three different glow-in-the-dark fabrics:


With Halloween less than a week away I need to make something with them soon! My plan (keyword - "plan") is to use the FREE circle skirt tutorial over at "MADE." Can't wait to try it out especially since I was eyeballing similar skirts in the stores (and refuse to pay that much for them!)

*eyeballing - I swear...it was purely a coincidence that I used that word! HA!

Happy early Halloween! Now off to make the spider Tootsie Pops for Kailani's class......

Last year's lollipops....gotta make a bunch more this year!

Need some more Halloween ideas? Check out ABC & 123's Show & tell Blog Hop!

abc button

Wednesday, October 20, 2010

Suncatcher Ghost

I hosted a Halloween craft playdate today for the little ones - fun, fun, fun! Prior to it I looked for a Halloween story to share. While there were many to choose from a lot of them were too "creepy" (according to Momo) and I certainly didn't want to creep any kids out before their big trick-or-treat day! 

I finally found a book that I thought would work - "Ghosts in the House" by Kazuno Kohara. It's a really cute story about a little girl that moves into a house which is haunted by ghosts - but she is not afraid because she is a witch and a ghost collector at that!  After capturing the ghosts she puts them into the washing machine and then uses them as curtains, a tablecloth and a few other things. What a clever little girl!  


We give this book two thumbs up!

After the story we did a follow up craft. Since the story was about happy ghosts we had the kids make some happy little ghost "suncatchers." 


All you need for the craft is Contact paper (you can find Contact paper where they sell shelf liners in the store) and random white crafting supplies like ribbon, tissue, glitter, etc. You also need scissors, tape and a pen (to draw the ghost - or you can cut the ghost out free hand if you're good at that!)

I found the idea here but instead of using felt to make the eyes we used googly eyes. Using contact paper was GREAT as it was sticky (but not too sticky) and definitely less messy than using glue!

Of course when Kailani came home from school she wanted to make one too: 


They look darling on the window! Try it! It's easy and fun! 

Edited to add:

If you are looking for lesson plans that include a story and some sort of craft please check out "A Mommy's Adventure" - stART (story-art):


Thanks so much to Katie from Katie's Nesting Spot for telling me about Michelle's blog!  (How did I not already know?!?)

Friday, October 15, 2010

Mini Manapuas

Lately Kailani has taken a liking to char siu - Chinese barbequed pork. I figured I'd better find a recipe and start cooking some at home! Then I remembered while living in Virginia a friend sending me an awesome care package from Hawaii with all of my favorite local-kine snacks. She also included a recipe for manapua (barbeque pork filled buns) and the spices to make them. Ahhhhh! Steamed/baked buns with char sui filling! I decided to make them tonight for my girls. I knew they would love it!  


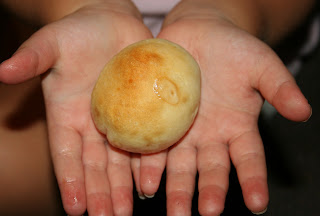
Yummy! Or "ono" as we say in Hawaii! They are small....but a little bigger than a donut hole. Check them out in Momo's hands:


If you are seeking an easy manapua recipe here's the one I used: 

Mini Manapua

1/2 lb. ground pork or hamburger
1/4 c. chopped green onion
    1/4 c. minced water chestnuts
    2-3 tbsp. char siu powder mix:
    2 cans refrigerator buttermilk biscuits

Brown ground pork or beef; add water chestnuts and char siu powder. Add green onions and turn off heat.  Drain oil and let cool.

Flatten biscuit in your hand to create a 2 inch round circle. Place a heaping teaspoon of filling in center of biscuit. Pinch edges of biscuit closed and place on waxed paper.

(Optional: place a dot of red food coloring on the top of each manapua.)

Bake for 10-12 minutes in 350 degree oven or steam for 15 minutes in steamer. Makes 20 manapuas.

How did the girls like them? Well, honestly......Momo wouldn't eat one (because I also made chow funn noodles, which she loves) and Kailani only ate the breaded part of the manapua. ARRRRGH. Eight-year olds....I swear!

Thursday, October 14, 2010

What 3rd Graders Have Taught Me.....

If it weren't for having a 3rd grader in the house I might not have ever learned about:


1. Silly Bandz. Are these popular where you are? Silly Bandz are silicone bracelets that are molded into different fun shapes such as zoo animals, sea animals, alphabets, fruits, etc. The kids collect them, wear them, stack them and trade them. Boys like them too!


(Reminds me so much of Madonna and her black jelly bracelets!)


You know if you were a child of the eighties you had some. :)

The other thing I would've never known about is:


2. Water Marbles (also known as crystal soil). I've seen them but never paid any attention to them as they are primarily used for decorative purposes in vases. They came up in conversation one day and I was told that they were all the rage with the kids. And since you buy them in the craft section of stores I HAD to go check it out!

Ben Franklin Crafts carries them but you can probably find them at just about any store that has a craft/floral section. Here's what the packaging looks like:


The crystals are itty-bitty!

I opened the entire package and dumped them into a bowl with 2.5 quarts of water (per instructions):


And here is what they look like four hours later:


Aren't they PRETTY?

The colors totally POP! One little package makes a lot, and I mean A LOT!!! Had I known that I wouldn't have opened two packages! I filled about six pasta jars full of them!

Each of the girls got a bowl full and they love to roll them around in their hands (I have to admit, it feels a bit therapeutic!) Over time the marbles will shrink back to their original size. When they do just add water to have them grow again!


Silly Bandz + water marbles = happy Momo. She treats them as if they are her pets. The first thing she did when she woke up this morning was grab her bowl to check on the little critters (of course she then proceeded to shove her whole hand into the bowl which causes  major spillage! And just an FYI - when the buggers spill they bounce all over the place! It is a big potential mess but oh-so-fun!)

***IMPORTANT NOTE: I thought I would mention that there is a warning on the packaging - water marbles are not recommended for children under the age of 14 as they are a choking hazard. Use at your own risk. And if you do use them, be responsible and supervise. Just wanted to pass that on.....

Monday, October 11, 2010

We Have Worms!

It's a funny story. Kailani has been describing herself as "earth girl", "ocean girl", or "nature girl." Anything to the effect of saving the earth. So last month, for Kailani's birthday one of my dearest friends, Mari came up with the most unique present for her: WORMS!


I SAY unique but that is NOT what I was thinking when she presented them to her. As a matter of fact I thought I misheard her. WORMS? By no means am I a girlie-girl but I am also not a lover-of-slimy-creatures kind of mom either.

Why worms? Well, I didn't completely understand the process but here's the info taken from the Waikiki Worm Company's website:

Recycle with earthworms!

Waikiki Worm Co. was established to address the issue of recycling of organic waste, which makes up 34% of Oahu's wastestream. Annually, 50,000 tons of food waste alone is generated on Oahu. Processing organic waste with worms - called VERMICOMPOSTING - transforms garbage into a nutrient-rich, odorless, pathogen-free, organic soil amendment that dramatically enhances the health of houseplants, garden plants, fruit trees, landscaping, lawns, and agricultural crops. Worm poop, also called gardeners' gold or VERMICAST, recycles nutrients back to the soil as nature intended. Vermicast is easily produced and harvested from your own kitchen worm bin.

Hmmmmm. Yeah. I'm all for the three R's - "reduce, reuse, recycle" but not if grossness was a factor.

Mari was kind enough to walk us through the process of feeding them and caring for them. I have to admit, it looked easy enough. But while she handled the worms like a pro I was not ready to touch the little creatures with a 10 foot pole.

Guess who else wasn't ready? Miss Earth Girl, Kailani! But lucky for the both of us somebody else was:


Momo. Our hero! She thinks the worms are "SOOOOOOOO CUTE!" Seriously. The way she acts you would think they were puppies!

So it's hasn't been quite a month since we first started caring for the worms and things are actually going well. We've been feeding them, watching them grow, and even making mistakes (overfeeding) but they are STILL ALIVE! (Whew!) 

But I'm still not ready to touch them.

In all sincerity, "THANK YOU, Mari!"

Friday, October 8, 2010

Brownies Rule!

Brownies rule! (Actually I prefer ice cream...)


And that's exactly what this shirt says from Old Navy! Perfect as we are now a part of the Girl Scout family! Technically it's only Kailani but of course Momo wants in on the action. One of the troop mother's found the shirt and suggested that all the girls have one as part of their "uniform."  Too cute to resist. And guess what? It's a "scratch and sniff" shirt! The shirt smells like chocolate brownies!
Kailani's troop is a small one with only six girls. Four of the six moms are leaders and take turns leading the group. Of course I volunteered and was thrown into the rotation. My teaching/leading day came fast and I was assigned to practice for the Investiture ceremony. 

The what? Investiture? I don't even know what that means! And I'm a newbie, remember? How do I prepare for a lesson that I know nothing about? "Google" and Facebook friends to the rescue!
I quickly learned what the ceremony was about: to recognize the newly joined Girl Scouts as well as the returning members that have moved up to the next level of scouting. In preparation the girls are required to memorize and recite Girl Scout Promise and be familiar with the Girl Scout Law.


After some brainstorming here's what I did:


First, I made some luggage tags for the girls. On one side I printed the "Promise" and on the other side I printed the "Law". I laminated it and tied a green ribbon onto it:


After the girls practiced reciting the law (all the girls did great!) I had them create a "Girl Scout Garden" with each of the laws being represented by a different seed/flower. Here are each of the laws with the flowers I chose to represent (and the reason why. I know, I know....some of the reasons I'm stretching it a bit!)


Girl Scout Law:


I will do my best to be:
  • honest and fair, (forget-me-nots - sign of faithfulness and enduring love)
  • friendly and helpful, (purple coneflower - also known as echinacea which is used to care for colds)
  • considerate and caring, (zinnia - thinking/thoughts/goodness)
  • courageous and strong, (foxglove - produces a drug to help your heart) and
  • responsible for what I say and do, (sweet pea - say and do sweet things) and to
  • respect myself and others, (carnation - flower of friendliness, be kind to youself and others)
  • respect authority, (lupine - grows tall)
  • use resources wisely, (cactus - uses little water)
  • make the world a better place, (sunflower - often used to represent green ideology) and
  • be a sister to every Girl Scout. (daisy - the Daisies are the youngest of the Girl Scouts)
I gave each of the girls a seed carton with 10 compartments (perfect as there are 10 laws) and they planted the seeds one at a time. The girls also put little tags in each compartment that identified the seed/law:


To avoid an even bigger mess I had the girls wait till they got home to water their plants: 


And guess what? Only three days later we have some sprouts! You can tell it's the sunflower!


Exactly a week later we have even more!


*Hopefully* when they tend to their garden they will be reminded of the laws they are supposed to abide by! The activity was super cool and super fun!

Wednesday, October 6, 2010

Photo Flashback

Been really busy - which explains the lack of posting! Moving, party planning, etc. etc. and now my father is here visiting while Kailani is on fall break. We're busy but having fun!

Today we went to a local family favorite restaurant - "Shiro's Saimin Haven and Family Restaurant" (known to the locals simply as "Shiro's") for some saimin. I took a picture of Kailani and my dad:


....when I suddenly I had a flashback and had to dig around for this photo when we got home: 


The second photo was taken over five years ago at Shiro's (told you it was a family favorite!) Kailani was only three at the time. While it looks like she's trying to psych him out to get a taste of his food she's actually secretely putting her green onions into his soup. What she didn't know, though, was that my dad loves green onions!


This time around things were different. Kailani wasn't putting stuff into his soup but taking things out. :)

Friday, October 1, 2010

Hoarder or just being prepared? A photo experiment......

Please tell me I'm not the only one. Actually, since sharing the pictures with friends I have been told that I am not alone and others feel my pain.


Every time we leave the house to go somewhere Momo (3.5) has to pack up a whole bunch of random stuff (at least it's random to me - to her it could be something of great significance!) to lug to the car. Even if it's for a five minute drive somewhere. It's rattles my nerves. But instead of getting annoyed this past week I took a picture whenever (minus a few occasions) we left the house.


Pompom, Pokemon cups, phone


Pompom, Pikachu hat, umbrella

Pompom & Legos
 

Shopping cart (I don't think so!) Princess purse, Pompom
 
Disappointed because she is minus the shopping cart.

 
Pompom, backpack with picnic items

Pikachu backpack, cap, paper towel roll, backpack and Pompom


Pikachu hat, Tupperware cups, Netflix envelope, cap, purse, sunglasses and Pompom


Two stuffed animals, Pokemon book. Where's Pompom, you ask?
Being washed! The world should thank me. ;)

And that, my dear friends....concludes this week's experiment. Now I must unload the van, or as my friends have suggested, have a mobile garage sale or advertise as a traveling swap meet!