HOME           ABOUT ME          RECIPES        
Showing posts with label kid's craft. Show all posts

Friday, July 16, 2010

I-Spy Bottle with Beautiful Rainbow Rice

Yesterday I hosted a craft playdate with the Honolulu Mommies. What a great group of gals! We had about 10 kiddos come and we made some I-Spy bottles! 

Prior to the playdate I made some rainbow rice:


The process is simple and only takes a few minutes! I'll tell you how at the bottom of this post!

Here are the bottles of prepped rice. Aren't the colors beautiful?  It would've been easier to have mixed the colors at home but I thought the kids might like to see all the different colors:


Here is the rice all mixed up. (Thanks to my hand model, Michelle!)


Everyone was asked to bring trinkets to share. We had pom-poms, buttons, pennies, BBs, stickers, marbles, bells, ribbon, foam cut-outs, pieces of felt, crayons, paper clips, alphabet beads, etc. etc.! After we got home we found some other things to add such as sea glass, shells, Lego pieces, erasers tops, and pieces of straw. I'm sure we'll find more things to add!


Funnels worked great to pour the rice into the bottles. However, paper funnels (roll the papers into a tube and tape) worked just as well!


And here are two of the completed bottles:


While I would have preferred that each bottle have only one of each trinket the kiddos seemed to really enjoy stuffing their bottles with whatever they could get hands on! They couldn't even wait for the stickers to be individually cut. Oh well!

Now....how to make the rainbow rice!

ll you need is rice, food coloring, rubbing alcohol, a baggie to mix the rice in, wax paper and some table space to let the color dry/set.

Obviously you can increase or decrease the amount of rice you are going to use but this is how I did it:

For each color:

  • pour 1 and 1/2 cups of rice into a baggie

  • add 1/2 tsp of rubbing alcohol

  • add a few squirts of food coloring

  • seal the bag and shake it up

  • when you have the desired color pour the rice out onto a flat surface covered with wax paper

  • let the rice dry - it only takes about 15 minutes!

  • repeat for each of the other colors
That's it!

To make the I-Spy bottle pour the rice into your bottle. For a 16.9 oz. bottle you need about 1 and 1/2 cups of rice. Don't fill the rice to the top or else you won't have room for your trinkets! Add your trinkets, seal it (I recommend using super glue or a hot glue gun to hold the seal) and shake it up!

Just an FYI - we were expecting about 10 kids to attend the playdate. Worried that others may show up unexpectedly or bottles of rice were going to spill I prepped 16 bottles and it was more than enough. A few of the kids happily ended up making more than one bottle! :)

*Thanks to Pink and Green Mama (one of my new favorite blogs for crafts!) for the inspiration and instructions on making rainbow rice! Only later did I notice that she also made I-Spy bottles with her rainbow rice! She had some GREAT trinkets. Go check her out!

Monday, April 26, 2010

Lowe's Build and Grow - Free Kid's Clinics!

Did you know that Lowe's hardware stores offers kid's clinics every Saturday? And get this...it's FREE! Their "Build and Grow" clinics offer kids the opportunity to build a different wood project each week. Take a look at some of the things they've already done and what's coming up next:


The kids receive a FREE apron, FREE goggles and a completion patch when they are done with their project! All the supplies are provided including a hammer (which must be returned).

We checked it out two weeks ago and were immediately hooked! Since the projects are recommended for kids in the 1st grade through 5th grade so we didn't sign Momo (3) up for the first one. But after checking out the first clinic we went ahead and signed her up for the next one. I think it really depends on your kid, their maturity level as well as mom or dad's level of patience. :)

Lucky for Momo her big sister is very sweet and let her have a turn. Check out Momo hard at work. Look at the intense concentration (as well as the upside down fogging goggles):


And here is a proud Kailani with her completed planter (which she later painted at home):

On our way out the door Kailani insisted that we sign up for the next one, which we did:

You can see we already sewed Kailani's patch onto her apron.

Here's the link to the clinic: Lowe's Build and Grow You can sign up online (recommended) or sign up at Lowe's if there is space available. Please note that this is a self-directed clinic. Parents (or grandparents, whoever) need to be able to assist their children with the project. There is no instructor walking you through the project step by step.

We give the clinic "two thumbs up!" and are looking forward to the next one (and the next one and the next one.....)

Thursday, October 29, 2009

Spider Lollipops


Need a last minute idea for your kid's class or Halloween party? Check these out. It took me about an hour to make 30 of them - and that includes having to stop every other minute due to a two year old and 7 year old wanting to play with them! All you need are Tootsie Pops (or any other lollipops), googly eyes, black pipe cleaners and some glue!

You probably don't need instructions on how to make it but just in case you do you can find them on the Family Fun website
here. Need more than written instructions? They even have a video demonstration!

Happy early Halloween!

Friday, August 14, 2009

We Have Sunflowers!


Remember back in June when I tried growing some sunflowers? Little buds had started to form before we left North Carolina but now they are in full bloom! Thanks to my father for taking a couple of pictures and sending them to share! Here is a picture update:

Day one: Wet the seeds.

Week one: We see sprouts!


Week two: Time to take them out and plant them!

We picked a spot:


This is what it looked like before we put it into the ground:

Week 5: You can clearly see three plants growing!


Week 9: A flower is forming!


Week 10 - We have a flower!


Week 11: We have MANY sunflowers!


Of course the little buggers were a bit camera shy and decided to face towards the fence rather than the camera.....

I'm not sure which variety of sunflowers each of these are - while we labeled them in the glove I forgot to label them when we planted them into the ground. Whoops! That's okay. I am just tickled to death that this experiment worked! From beginning to end the entire process took approximately 2.5 months. It was well worth the wait!

Please see my original post for more details or head over to JesseKate Designs where the idea originated!

Monday, June 8, 2009

Growing Sunflowers - Craft

If there is one thing that I lack it is a green thumb. I am SO lacking that is makes me ridiculously proud of myself for keeping my father's poinsettia plant alive. Let's see, he received it right before Christmas which means I've kept it alive for FIVE MONTHS! That's gotta be a record! However, I have to give credit where credit is due. The ONLY reason why it hasn't died is because of the Aqua Globe. (They are the bomb, I tell ya! The bomb!)

Anyways!

Kailani's first grade class has been learning about the life cycle of a plant. At about the same time Kris from JesseKate Designs posted a related craft activity she called "Gardening with a Glove" It was a really cute idea and I thought I'd attempt it with my girls.

Since Kailani's favorite flower is the sunflower we bought five different kinds to see which would grow the best. Here are a few pictures from the activity. (Please go to JesseKate Designs for full instructions!)


And then a week later:

(HOLY SMOKES! IT'S WORKING!!!)


And today - approximately two weeks since beginning the activity.
(HOLY SMOKES! THEY ARE STILL ALIVE!)

We plan on putting them into the ground either today or tomorrow. I will keep everyone posted on how it turns out!

For tips on growing sunflowers click here.

Thanks Kris, for an awesome activity!

Monday, April 20, 2009

I Love You *THIS* Much!

Many moons ago I was a member of "The MOM'S Club" (Moms offering Moms Support) in Hawaii. One of the volunteer positions I took on was being the coordinator for "Art in the Park." Once a month I would organize a simple and quick mommy-and-me craft to do with our kids.

I happened to notice on my father's refrigerator one that Kailani did for him nearly three years ago:


On the inside is written, "I love you THIS much":


When you pull the hands out the length of the ribbon it is the same length as when your kiddos stretch their arms out to show you how much they love you. Isn't that sweet?

With Mother's Day coming up I thought this might be a good project to share with everyone. I can't be for certain but I believe I got the idea from Family Fun magazine. Obviously it can be done for anyone at any time of the year. Kailani decided to make one for daddy since daddy is away right now.

Here are the supplies you will need:

1) construction paper or card stock
2) yarn or ribbon
3) markers, crayons, pencils, etc.
4) other types of crafts to decorate such as stickers, Foamies, stamps, pom poms, buttons, glitter glue, etc.
5) scissors
6) glue or tape
7) hole puncher (optional)

Kailani will now show you how it's done. :)

1) First thing you have to do is trace both hands (older kids can trace their own.) If you have a wiggle worm who is not going to sit still for you long enough to trace both hands then trace one and cut out two copies.


2) Cut out the hands. (If you can handle seeing mistakes or uneven cuts go ahead and let your older kiddo cut it themselves. I was itching to take over the cutting but I resisted. It was hard, but I did it. GOOOOO me!)


3. Optional - punch a small hole in the palm of each hand. This is where you will thread the ribbon. If you don't want to punch a hole you can always use tape later.


4. Write "I love you THIS much" on the inside of the hands. You can write a little on each hand or write it all on one.


4. Decorate both hands, inside and out with stickers, stamps, pom poms, etc. Kailani cut out a heart from different colored card stock and wrote "To Daddy" on one and "From Kailani" on the other. If you do this don't paste it on just yet!

5. Using yarn or ribbon measure out your kiddos outstretched hands and cut.


6. Thread ribbon through the holes and tape on the outside.


8. Tape/glue the "to" and "from" hearts over the taped ribbon. Finish decorating.


That's it!
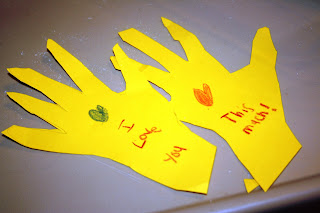

Inside of hands:


Outside of hands: