HOME           ABOUT ME          RECIPES        

Friday, February 26, 2010

Thank you Nebraska.....

....for the super cool postcard! :)

We only need FOUR more postcards to complete our 50 state postcard exchange! Can you help? We still need:
  1. Delaware
  2. Mississippi
  3. Oklahoma
  4. South Dakota
Thanks everyone!

Monday, February 22, 2010

The Winner of the Apron Giveaway is......

Reversible Mama's Helper Apron

#28 - Mama King!

Congratulations! I hope your girls enjoy *sharing* the apron! (Yes....big can of worms!)

Thanks to all that took the time to participate!

Friday, February 19, 2010

Mini Chocolate-Caramel Apples

*Sigh*

No.

Make that a HUGE exhale.

Kailani is going to be in a play today - "Johnny Appleseed." While she is only a chorus girl you would think she was going to be the star of the show. She is incredibly excited. It's so cute.

After the play the parents will join the class for a little apple potluck. We were asked to bring in food items made from apples. Apple bread, apple juice, apple sauce, you get the picture. I thought this would be the perfect opportunity to try and make the mini-caramel apples I recently saw while surfing the web. Here's how they turned out:


They are teenie-tiny and oh-so cute! I used a melon baller to scoop bits of apple, coat it with chocolate and then coat it with the caramel. Easy enough, right?

Noooooo. At least not for me. It took me a few times to get used to using the melon baller. At first my scoops were too shallow but I eventually got the hang of it. The hardest part was working with the caramel. It was a pain in the you-know-what. After making about 12 of the miniature apples I finally figured it out and was depressed because I had so many more to make! At this moment in time I would have to tell you, "never again." I should've (and could've) just left them like this:

With a white chocolate coating. Oh-la-la-yum! Bite-sized yumminess.

There are TONS of recipes for miniature caramel apples on the web. A common complaint I found was that the caramel tends to slide right off the apple instead of stick to it (because the skins of the apple are removed.) One solution is to coat the apple with a seal of chocolate and then chill it. This helps retain the moisture of the apple and then allows the caramel to stick to the chocolate. But enough of that. Here's the recipe that I used:

Miniature Caramel Apples

Just when I thought, "never again" Kailani's teacher made a fuss over them when I dropped them off. Okay. Maybe I will try them again. Just maybe. But next time I will look for the caramel apple wraps (as recommended in one of a million recipes I read) instead of melting the caramel myself. It'll save me some time and frustration!

Thursday, February 18, 2010

Delaware, Mississippi, Nebraska, Oklahoma & South Dakota - HELP!

Life got a little busy with all the party planning and sewing but now I'm back to recruit for a few more postcards to complete our 50 States Postcard Exchange!

We still need postcards from:


1) Delaware

2) Mississippi

3) Nebraska
*
4) Oklahoma

5) South Dakota


Can you help wrap up our project? If you can please send me an email at SHARKritzler@aol.com and I'll send you our mailing address. Thanks again to all that have already sent one! Much mahalo to you! :)


*Nebraska - I'm almost 100% positive that we received a postcard from Nebraska but I think the little monster might have gotten hold of it before I was able to do anything with it. I am going to attempt to tear the house apart and look for it again!

Tuesday, February 16, 2010

Finally.....the Cupcake Party

After weeks of planning, crafting, sewing and baking Momo's 3rd birthday party arrived!

Since space is limited in our tiny apartment we rented out the party room at the Cupcake Boutique (thanks dad!):


I wish I could take credit for the incredible decorations but I can't. The room comes decorated just like this!

I used some of the cupcakes we made to display Momo's birthdays through the years:


Displayed the ginormous cupcake cake:


BTW - I used " Wilton's "Giant Cupcake Pan". I did some research and found that a lot of people preferred this one over the silicone one. It was easy to use. I did bake the bottom piece first for about 15 minutes before adding the batter for the top piece. Also I didn't see the need even frost the bottom half.

I also made some "cupcake bites":

I found the recipe on Jahjong's blog and just had to try it! Her tutorial is fantastic and it ended up being much easier than I anticipated. My pictures don't do these little bites justice - they are small! Here's a picture in my daughter's little hand:
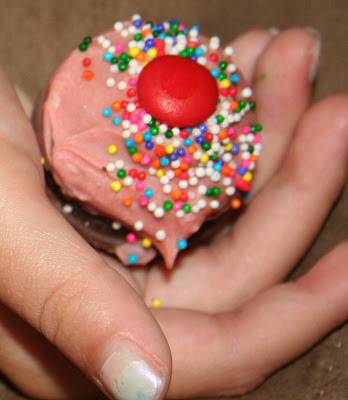

And they were surprisingly yummy! A little crunchy on the outside and soft on the inside. I can't wait to make these again!

We also had some face painting thanks to my best friend and her daughter:

The girls frosted cupcakes:


And of course there was licking of the frosting:


A little game of pin the cherry on the cupcake (poster made by Kailani):


I totally forgot to bring a blindfold so the birthday crown came in handy:


And those that had their face painted we found the apron to be a better alternative:


It was finally time to blow out the candles and Momo couldn't wait. She blew them out before we even sang "Happy Birthday" to her!


It ended up being a fun little party with some fun little girls! :)

Monday, February 15, 2010

Don't Eat the Cupcakes!

Take a look at these......


Pretty, don't you think? My husband said the house looked like a bakery. The thing is it didn't smell like one because you can't eat them. They are fake! Bummer.

Can you take a guess at what they are made of? Want a hint?

You find the supplies in the hardware department.

The answer: the bottom of the cupcakes are made of expansion foam and the frosting is made from spackling. Crazy, isn't it?

I found a tutorial on how to make the cupcakes at Instructables. What a great website! The directions were clear (though I would recommend a few changes - will add my notes to the bottom of this post) and there were plenty of pictures. They were tons of fun to make! The hardest part about the whole process was waiting for them to dry.

While I didn't take pictures of the whole process here are a few that I did take:

I didn't want the girls to handle the foam or spackling so I assigned Momo to be in charge of putting cupcake liners in the pan :


I filled the liners with expansion foam about 2/3 of the way full:


They got bigger.....


And then they got HUGE:


After they were completely dry we painted them. Momo painted hers to look like chocolate cupcakes and Kailani painted hers to look like vanilla cupcakes:


Unfortunately I don't have photos for the rest of the process (which was probably the most fun part - the frosting!) But again, you can find the full tutorial here.

So when I was done with the cupcakes I needed a pretty way to display them. I have a cupcake stand but the bottoms of my cupcakes were so wide they didn't fit! I really did not want to go out and buy another type of holder so I ended up making one:


I'm not crazy about my fabric choice but I really didn't want buy more fabric just for this project. PLUS, I had to keep reminding myself that the party is for THREE YEAR OLDS and they really aren't going to care (or even notice!) I simply cut out pieces of cardboard and covered them with fabric; used a salt container as the middle stand (and covered it with fabric as well) used a hot glue gun to attach the three pieces and added some ribbon. That's it! The potential to making a really pretty one is totally there!

*Notes on the tutorial:

1) I tried coloring the frosting of the cupcakes two different ways. I first tried it as recommended by the tutorial - by adding acrylic paint to the spackling. Then I tried painting the frosting when dry. I found the 2nd way to work much better. Plus, it's much quicker to do it this way if you are wanting to color your cupcakes several different colors. If you are only painting them one or two colors mixing the paint with the spackling might be easier.

2) Initially I did not buy enough spackling. So when I went back for more I bought a different type - it is pink when applied and turns white when dry. Works great - EXCEPT if you plan to mix your paint with the spackling. It totally affects the end color result. If you use the pink spackling bypass adding paint to the spackling and paint the frosting when dry.

3) As noted in the tutorial one can of expansion foam makes a LOT and you cannot store/keep the foam once opened. One can ended up making about 30+ cupcakes - and if you make them smaller than I did it would make even more! But you could always make a lot and then save them for another day to use.....

Friday, February 12, 2010

*LOST* Sighting!!!


"LOST". Need I say more? Even if you're not a huge fan I'm sure you've heard of the show!

As you may or may not know "LOST" is filmed here in Hawaii. Years ago I saw Josh Holloway (Sawyer) walk by in the park and Daniel Dae Kim (Jin) in the mall. They also did a lot of filming near where I used to live....

Well, yesterday my girlfriend called me with a frantic message. I swear I could not understand a word that she said. When she finally calmed down she told me that she nearly ran into Matthew Fox and Sam Anderson of Lost. She told me where they were filming and encouraged me to go.

Seriously? Did you forget that I am now 40 years old with my two kids in tow in my minivan?

I'll be right there. :)


Yes - Matthew Fox smokes. I was a little disappointed, but oh well.


Momo was actually a really good girl. The crew would yell, "Rolling" (aka - "QUIET!") and then later, "cut" (aka - "Okay Momo, you can talk now.)


The girls with Sam Anderson (Bernard). He was SUPER SWEET. He was more than happy to take a picture with the girls...even called them "beautiful". :) He really was a cool guy - waving and smiling at everyone!

Cool day! :)

Monday, February 8, 2010

Winner & Giveaway!

Most of you know that I'm a big fan of "You Can Make This". They recently held an "I Made This!" contest where you could submit your own photos of things you have made using patterns sold by YCMT. Well guess what? I entered four different pictures and.......

*Drum roll please........* I WON!!!!

(*Applause*Applause*Applause*Thank You!*Thank You!*)

Can you say super stoked?

So what did I win? A bundle pack of patterns worth over $100! Dress patterns, doll patterns, pillow patterns, holiday patterns, etc!


Yeah. Super-duper-stoked!
So I want to share my luck with others! Not just because I won but I just realized that my one year blogging anniversary (blogiversary) has come and gone!

Can I get another "Whoo-hoo!" (Why do I write that when I don't even SAY that? Seriously?!?)

Since I won using a YCMT pattern I thought I would make something using one of their patterns to give away. How about a "Little Helper Reversible Apron" much like I made awhile ago? I had such a great response and luckily have enough of each of the fabrics to make another. Same pattern, same print. Here's a picture of it in case you missed it months ago:

It'll be hot off the machine - much like a bakery. :) I've got a ton of things to finish up this week for my daughter's birthday party so I can't even start on it till after the weekend!

Here's how you can win:
Leave me a comment telling me who you would gift the apron to. Please be sure to leave your email address if it's not easily located in your Blogger profile.

That's it!

But.....if you'd like to increase your chances of winning here's what you can do: (please leave a separate comment for each:)

Extra entry #1) Become a follower of my blog. Already a follower? Just let me know!

Extra entry #2) Tweet about this giveaway. (No need to become a follower on Twitter as I've been Tweet-lazy.) You can Tweet once a day. Leave me a link to your Tweet!

You can copy and paste the following (or create your own):

Mama's a Mess is hosting a giveaway! Win a "Little Helper Reversible Apron" Enter at www.mamasamess.blogspot.com . Contest ends 2/21.

Extra entry #3) My Etsy store will be open soon (soon is a relative term, right?) so head on over there and "heart" me as one of your favorites!

Extra entry #4) Earn FIVE extra entries by blogging about this giveaway! Post about it on your blog and link back to this thread. Let me know where to find it on your blog! Be sure to comment five extra times for five extra chances to win!

Contest is open to US & Canada residents only (sorry other International friends!) One winner will be chosen at midnight E.S.T. on Sunday, February 21st via Random.org. Winner will be announced here on this blog as well as be sent an email notification. Response is required within 48 hours or a new winner will be selected.

Thanks so much for celebrating with me!

GOOD LUCK!

Edited to add: My dear Canadian friends....I have opened up the contest to you as well! :) Thanks for your support!

Thursday, February 4, 2010

Cupcake Game

Look at this fabric! Is it cute or what?


Now, what to do with it? How about this:


Know what it is? No? Yes? Maybe? What if I showed you this:


Ahhhh....a felt memory game!

The fabric is by Timeless Treasures - their "Got the Munchies?" line. I thought it was super cute and absolutely perfect to do something with for Momo's cupcake party. With 12 different, perfectly sized cupcakes on the print which are evenly spaced (easy to cut!) I thought it would be great to make a memory game. Since most of our guests are a mere three years old I'm going to package three or four pairs of matching cards to give away as party favors. That should be enough, right?

Cutting. Ugh. Lots of cutting. (How do quilters do it?) Cut the cupcakes, cut the adhesive, cut the felt.....not hard but time consuming.

While I intended for this to be a no-sew project I ended up using my machine. However, it CAN be done without sewing! (You could use a fabric glue or iron-on type adhesive.) I used some iron-on adhesive to attach the fabric onto the felt and in addition did a straight stitch around the edges. Pinking the edges of the felt made it look that much cuter. :)

Can I just mention that I now know the difference between wool felt and craft felt? OH MY....what a difference! Lots of love for wool!

Got a lot more cupcake things to do.....better get on it! :)

Wednesday, February 3, 2010

Cupcake Fever

It's been a crazy couple of weeks. Had family in town, my 40th birthday (I'm TOTALLY okay with it...you know...in case you're wondering!) and now I'm getting ready for Momo's 3rd birthday party!

The theme for the party is "cupcakes"...how fun is that? Don't be surprised if my posts up until her party are cupcake filled! :)


Speaking of which - hot off the sewing machine is a cu
pcake felt crown. Please excuse the stray strands of thread - I will take care of those! :)

I found the FREE crown tutorial over at Juicy Bits. You should see the crown that she made! If my machine had the capabilities of making all of those beautiful stitches I would've been all over that! The instructions are very thorough and clear with lots of pictures (which I love!)

The cupcake in the middle of the crown was inspired by
Flapper Girl's cupcakes! They are SO cute! Flapper Girl has a tutorial & pattern for the cupcakes available for purchase in her Etsy store for dirt cheap! Check out her blog as well as her store!

Next are some toddler aprons for all the little girls attending the party. Of course they were made with cupcake fabric!

I found the tutorial on one of my favorite sites - Skip to My Lou. I made eight of them in no time at all! Well, that's not true because here's what my sewing schedule looks like:

Sew. Get juice. Sew. Put someone in time-out. Sew. Change the channel. Sew. Help with homework. Sew. Break up an argument. Sew. Clean up a mess. *REPEAT*

I didn't even realize until after I was done that the apron is reversible! Glad I used a super cute fabric underneath! :)

Thanks to Skip to My Lou, Flapper Girl and Juicy Bits for all of your inspiration! Now off to make more cupcake stuff!